

Operating Instructions — Radio Mode
NOTE: The ignition switch must be in the ON/RUN or ACC position to operate the radio.
Power Switch/Volume Control (Rotary)
Push the ON/VOLUME control knob to turn on the radio. Push the ON/VOLUME control knob a second time to turn off the radio.
Electronic Volume Control
The electronic volume control turns continuously (360 degrees) in either direction without stopping. Turning the ON/VOLUME control knob to the right increases the volume and to the left decreases it.
When the audio system is turned on, the sound will be set at the same volume level as last played.
SEEK Buttons
Press and release the SEEK buttons to search for the next listenable station in AM/FM mode. Press the right switch to seek up and the left switch to seek down. The radio will remain tuned to the new station until you make another selection. Holding either button will bypass stations without stopping until you release it.
Voice Command System (Radio) — If Equipped
Refer to “Voice Command” in the Uconnect™ User Manual located on the DVD for further details.
Voice Command Button Uconnect™ Phone — If Equipped
Press this button to operate the Uconnect™ Phone feature (if equipped). Refer to “Voice Command” in the Uconnect™ User Manual located on the DVD for further details.
If your vehicle is not equipped with or this feature is not available on your vehicle, a “Not Equipped With Uconnect Phone” message will display on the radio screen.
Phone Button Uconnect™ Phone — If Equipped
Press this button to operate the Uconnect™ Phone feature (if equipped). Refer to “Uconnect™ Phone” in the Uconnect™ User Manual located on the DVD for further details.
If your vehicle is not equipped with or this feature is not available on your vehicle, a “Not Equipped With Uconnect Phone” message will display on the radio screen.
TIME Button
Press the TIME button to alternate display of the time and radio frequency.
Clock Setting Procedure
1. Press and hold the TIME button until the hours blink.
2. Adjust the hours by turning the right side TUNE/ SCROLL control knob.
3. After adjusting the hours, press the right side TUNE/ SCROLL control knob to set the minutes. The minutes will begin to blink.
4. Adjust the minutes using the right side TUNE/ SCROLL control knob. Press the TUNE/SCROLL control knob to save time change.
5. To exit, press any button/knob or wait five seconds.
The clock can also be set by pressing the SETUP button.
For vehicles equipped with satellite radio, press the SETUP button, use the TUNE/SCROLL control to select SET CLOCK, and then follow the above procedure, starting at Step 2. For vehicles not equipped with satellite radio, press the SETUP button and then follow the above procedure, starting at Step 2.
INFO Button
Press the INFO button for an RDS station (one with call letters displayed). The radio will return a Radio Text message broadcast from an FM station (FM mode only).
RW/FF
Pressing the RW (Rewind) or FF (Fast Forward) buttons causes the tuner to search for the next frequency in the direction of the arrows. This feature operates in either AM or FM frequencies.
TUNE Control
Turn the rotary TUNE/SCROLL control knob clockwise to increase or counterclockwise to decrease the frequency.
Setting the Tone, Balance, and Fade
Push the rotary TUNE/SCROLL control knob and BASS will display. Turn the TUNE/SCROLL control knob to the right or left to increase or decrease the bass tones.
Push the rotary TUNE/SCROLL control knob a second time and MID will display. Turn the TUNE/SCROLL control knob to the right or left to increase or decrease the mid-range tones.
Push the rotary TUNE/SCROLL control knob a third time and TREBLE will display. Turn the TUNE/SCROLL control knob to the right or left to increase or decrease the treble tones.
Push the rotary TUNE/SCROLL control knob a fourth time and BALANCE will display. Turn the TUNE/ SCROLL control knob to the right or left to adjust the sound level from the right or left side speakers.
Push the rotary TUNE/SCROLL control knob a fifth time and FADE will display. Turn the TUNE/SCROLL control knob to the left or right to adjust the sound level between the front and rear speakers.
Push the rotary TUNE/SCROLL control knob again to exit setting tone, balance, and fade.
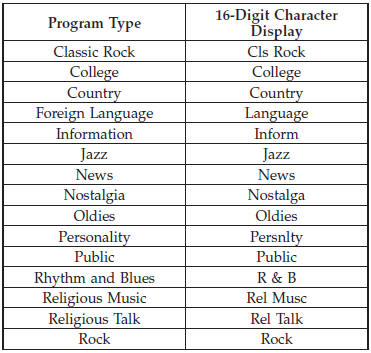
MUSIC TYPE Button
Pressing this button once will turn on the Music Type mode for five seconds. Pressing the MUSIC TYPE button or turning the TUNE/SCROLL control knob within five seconds will allow the program format type to be selected.
Many radio stations do not currently broadcast Music Type information.
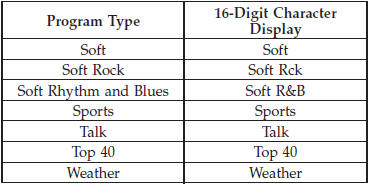
Toggle the MUSIC TYPE button to select the following format types:

By pressing the SEEK button when the Music Type icon is displayed, the radio will be tuned to the next frequency station with the same selected Music Type name. The Music Type function only operates when in the FM mode.
If a preset button is activated while in the Music Type (Program Type) mode, the Music Type mode will be exited and the radio will tune to the preset station.
SETUP Button
Pressing the SETUP button allows you to select between the following items:
• Set Clock — Pressing the SELECT button will allow you to set the clock. Adjust the hours by turning the TUNE/SCROLL control knob. After adjusting the hours, press the TUNE/SCROLL control knob to set the minutes. The minutes will begin to blink. Adjust the minutes using the right side TUNE/SCROLL control knob. Press the TUNE/SCROLL control knob to save time change.
AM/FM Button
Press the button to select either AM or FM mode.
SET/RND Button — To Set the Pushbutton Memory
When you are receiving a station that you wish to commit to pushbutton memory, press the SET/RND button. The symbol SET 1 will now show in the display window. Select the button (1–6) you wish to lock onto this station and press and release that button. If a button is not selected within five seconds after pressing the SET/ RND button, the station will continue to play but will not be stored into pushbutton memory.
You may add a second station to each pushbutton by repeating the above procedure with this exception: Press the SET/RND button twice and SET 2 will show in the display window. Each button can be set for SET 1 and SET 2 in both AM and FM. This allows a total of 12 AM and 12 FM stations to be stored into pushbutton memory.
The stations stored in SET 2 memory can be selected by pressing the pushbutton twice.
Every time a preset button is used, a corresponding button number will display.
Buttons 1 - 6
These buttons tune the radio to the stations that you commit to pushbutton memory (12 AM and 12 FM stations).
DISC/AUX Button
Pressing the DISC/AUX button will allow you to switch from AM/FM modes to DISC/AUX mode.
See also:
Installing The LATCH-Compatible Child Restraint System
We urge you to carefully follow the directions of the
manufacturer when installing your child restraint. Not all
child restraint systems will be installed as described here.
Again, carefully foll ...
Traction Grades
The Traction grades, from highest to lowest, are AA, A, B,
and C. These grades represent the tire’s ability to stop on
wet pavement, as measured under controlled conditions
on specified govern ...
Maintaining Your Air Bag System
WARNING!
• Modifications to any part of the air bag system
could cause it to fail when you need it. You could
be injured if the air bag system is not there to
protect you. Do not modify the ...