

Jacking Instructions
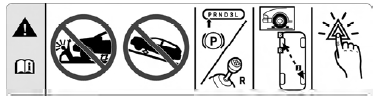
WARNING!
Carefully follow these tire changing warnings to help prevent personal injury or
damage to your vehicle:
• Always park on a firm, level surface as far from the edge of the roadway as possible before raising the vehicle.
• Turn on the Hazard Warning flasher.
• Block the wheel diagonally opposite the wheel to be raised.
• Set the parking brake firmly and set an automatic transmission in PARK; a manual transmission in REVERSE.
• Never start or run the engine with the vehicle on a jack.
• Do not let anyone sit in the vehicle when it is on a jack.
• Do not get under the vehicle when it is on a jack.
• Only use the jack in the positions indicated and for lifting this vehicle during a tire change.
• If working on or near a roadway, be extremely careful of motor traffic.
• To assure that spare tires, flat or inflated, are securely stowed, spares must be stowed with the valve stem facing the ground.
Jack Warning Label
CAUTION!
Do not attempt to raise the vehicle by jacking on locations other than those indicated
in the Jacking Instructions for this vehicle.
1. Remove the spare tire, jack and tools from the stored location.
2. Loosen (but do not remove) the wheel lug nuts by turning them to the left one turn while the wheel is still on the ground.
3. Assemble the jack and jacking tools. Connect the jack handle driver to the extension, then to the lug wrench.
4. Operate the jack from the front or the rear of the vehicle. Place the jack under the axle tube, as shown. Do not raise the vehicle until you are sure the jack is fully engaged.
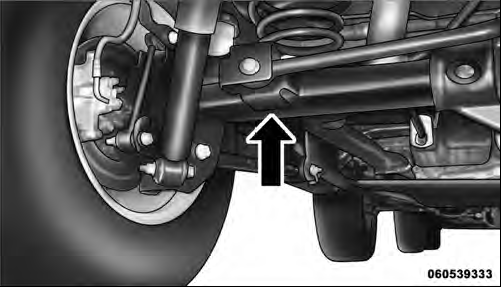
Rear Jacking Location
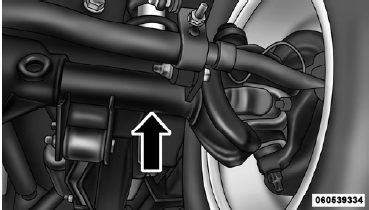
Front Jacking Location
5. Raise the vehicle by turning the jack screw to the right.
Raise the vehicle till the tire is raised from the surface of the road. Minimum tire lift provides maximum stability.
WARNING!
Raising the vehicle higher than necessary can make the vehicle less stable and cause
a collision. It could slip off the jack and hurt someone near it. Raise the vehicle
only enough to remove the tire.
6. Remove the lug nuts and wheel.
7. Position the spare wheel/tire on the vehicle and install the lug nuts with the cone-shaped end toward the wheel.
Lightly tighten the lug nuts clockwise.
WARNING!
To avoid the risk of forcing the vehicle off the jack, do not tighten the wheel
nuts fully until the vehicle has been lowered.
8. Lower the vehicle by turning the jack screw to the left, and remove the jack.
9. Finish tightening the lug nuts. Push down on the wrench while tightening for increased leverage. Alternate nuts until each nut has been tightened twice. The correct wheel nut tightness is 95 ft lbs (130 N·m). If in doubt about the correct tightness, have them checked with a torque wrench by your authorized dealer or at a service station.
10. Remove the jack assembly and wheel blocks.
11. Secure the tire, jack, and tools in their proper locations.
12. Remove blocks from wheels.
WARNING!
A loose tire or jack, thrown forward in a collision or hard stop, could endanger
the occupants of the vehicle.
Always stow the jack parts and the spare tire in the places provided.
See also:
Gear Ranges
DO NOT race the engine when shifting from PARK or
NEUTRAL into another gear range.
PARK
This range supplements the parking brake by locking the
transmission. The engine can be started in this ra ...
CD/DVD Disc Maintenance
To keep a CD/DVD in good condition, take the following
precautions:
1. Handle the disc by its edge; avoid touching the
surface.
2. If the disc is stained, clean the surface with a soft cloth,
...
Preparations For Jacking
1. Park the vehicle on a firm, level surface. Avoid ice or
slippery surfaces.
WARNING!
Do not attempt to change a tire on the side of the
vehicle closest to moving traffic, pull far enough off ...