


Towing A Disabled Vehicle
This section describes procedures for towing a disabled vehicle using a commercial wrecker service. If the transmission and drivetrain are operable, disabled vehicles may also be towed as described under “Recreational Towing” in the “Starting And Operating” section.
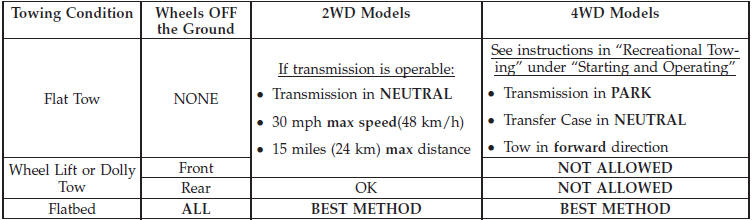
Proper towing or lifting equipment is required to prevent damage to your vehicle. Use only tow bars and other equipment designed for the purpose, following equipment manufacturer’s instructions. Use of safety chains is mandatory. Attach a tow bar or other towing device to main structural members of the vehicle, not to bumpers or associated brackets. State and local laws applying to vehicles under tow must be observed.
If you must use the accessories (wipers, defrosters, etc.) while being towed, the ignition must be in the ON/RUN position, not the ACC position.
If the vehicle’s battery is discharged, refer to “Shift Lever Override” in “What To Do In Emergencies” for instructions on shifting the automatic transmission out of the PARK position for towing.
CAUTION!
• Do not attempt to use sling type equipment when
towing. When securing the vehicle to a flat bed
truck, do not attach to front or rear suspension
components. Damage to your vehicle may result
from improper towing.
• If the vehicle being towed requires steering, the ignition must be in the ON/RUN or ACC position, not in the LOCK/OFF position.
See also:
Coolant Level
The coolant bottle provides a quick visual method for
determining that the engine coolant (antifreeze) level is
adequate. With the engine idling, and warm to normal
operating temperature, the le ...
Satellite Radio
To switch to satellite radio mode, say “Sat” or “Satellite
Radio”. In this mode, you may say the following commands:
• “Channel Number” (to change the channel by its
spoken number) ...
Towing A Disabled Vehicle
This section describes procedures for towing a disabled vehicle using a commercial
wrecker service. If the transmission and drivetrain are operable, disabled vehicles
may also be towed as describe ...